Configuring MacOS X Mail.app
Mail.app info
Mail.app, which comes with MacOS X, is a robust mail client that
is designed for MacOS X. It supports multiple email accounts, both POP and IMAP,
and is fairly friendly and easy to use.
Running Mail.app for the First Time

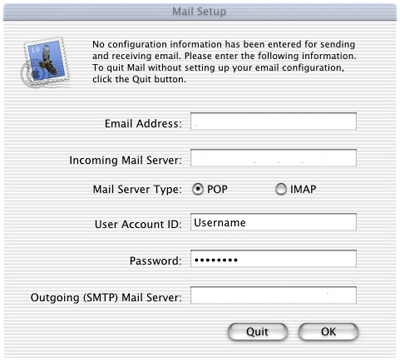
If this is the first time you've run Mail.app, you'll be presented
with a simple dialogue which will allow you to enter all your details in one
go.
- Email Address: should be the subscribers email address.
- Incoming Mail Server:
For @cali.co.uk accounts this is: cali.co.uk
For @ecosse.net acccounts this is: mail.ecosse.net
For intercali "own domain" accounts this is: mail.domain
- Mail Server Type: should normally be set to 'POP'. (We
support IMAP on ecosse.net and Intercali but not FirstClass)
- User Account ID:
For @cali.co.uk accounts this is their FirstClass userid
For @ecosse.net acccounts this is their account name (without @ecosse.net
For intercali "own domain" accounts this is their full email address
- Password: users mailbox password
- Outgoing (SMTP) Mail Server:
For @cali.co.uk accounts this is: gate.cali.co.uk
For @ecosse.net acccounts this is: mail.ecosse.net
For intercali "own domain" accounts this is: mail.domain
That's all. Mail.app is now set up.
Adding an account to Mail.app
If you already have an account configured in Mail.app, adding another
account is a slightly more involved process, but still a simple one.
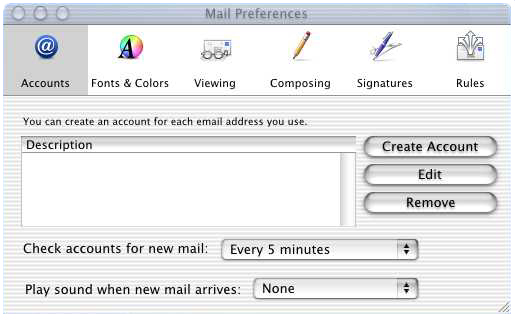
First, open the Preferences for Mail.app, by going to the Mail menu
and selecting 'Preferences...'. The following window should open and list all
the accounts currently configured for Mail.app.

Click on 'Create Account' to configure Mail.app for a new account.
Account Information

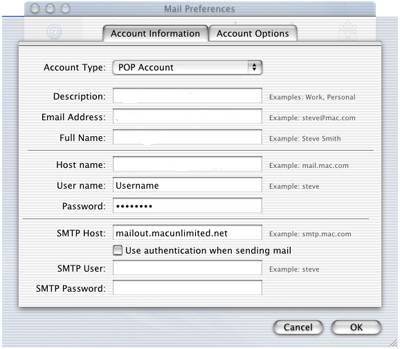
This is where you tell Mail.app which servers to contact for your
email. The entries should be:
- Account Type: should normally be set to 'POP Account'. (We support
IMAP on ecosse.net and Intercali but not FirstClass)
- Description: anything you like. Something along the lines of Calico
UK or ecosse would make sense and be easy to understand
- Email Address: should be the subscribers email address.
- Host Name:
For @cali.co.uk accounts this is: cali.co.uk
For @ecosse.net acccounts this is: mail.ecosse.net
For intercali "own domain" accounts this is: mail.domain
- User Name:
For @cali.co.uk accounts this is their FirstClass userid
For @ecosse.net acccounts this is their account name (without @ecosse.net
For intercali "own domain" accounts this is their full email address
- Password: users mailbox password
- SMTP Host::
For @cali.co.uk accounts this is: gate.cali.co.uk
For @ecosse.net acccounts this is: mail.ecosse.net
For intercali "own domain" accounts this is: mail.domain
- Use authentication when sending mail: unticked.
- SMTP User: blank.
- SMTP Password: blank
Account Options

In the Account Options settings, you tell Mail.app how and when
to check the account and what to do with mail it receives. Set the options as
follows:
- Enable this account: ticked.
- Include this account when checking for new mail: Ticked.
- Delete messages on server after downloading: Normally Ticked
- You may select either to download messages into the INBOX, or
seperately. Users with many active accounts may want to seperate their email.
- Prompt me to skip messages over <blank> KB: allows you
to delete large emails instead of downloading them. If you've ever cursed
the 3mb attached file on a message, use this setting.
- Connect to server using port: 110.
- Account Directory: blank.
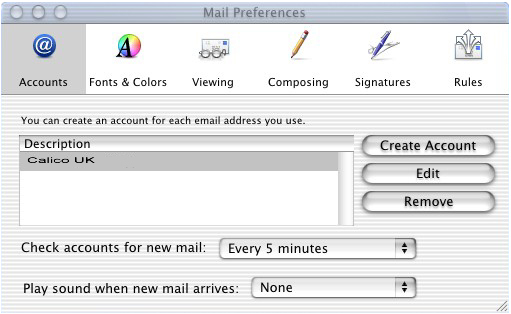
That's it. Hit 'OK' and you'll see:
Mail Preferences (Account Configured)

After that sheet closes, you should see the new account in the Accounts
list. That's it and Mail.app is ready for use..


